| Home | Product FAQs | KKL interface - VAG-COM 409.1 on Windows 7 |
Installing VAG-COM 409.1 on Windows 7
The shareware version of Ross-Tech's VAG-COM package - version 409.1 - was written in 2004, and so was never designed to work with Windows 7.Ross-Tech have since released VCDS-Lite, which is compatible with Windows Vista / 7, and so is a better option.
However, should you still wish to use VAG-COM 409.1, it can be made to do so if installed correctly, using the steps below.

|
VW Audi USB KKL Diagnostic Interface CableVW Audi Seat Skoda USB Interface for VCDS Lite - for most VAG cars 1996-2003 |
only
£19.94
(inc VAT & UK delivery) |
Most VW Audi group cars switched to CAN diagnostics the first time they were updated from 2004 onwards.
If your car is a 2004 or newer model, you will probably need a full version VCDS package instead.
See our VCDS package chooser tool to see which version you need.
- Install the USB drivers for the interface
- Verify the port settings
- Download and install the VAG-COM software
- Configure the VAG-COM software
Stage 1: Install the USB drivers for the interface
To get your interface up and running, you need to install software device drivers for the USB interface.
If you are installing the package on a PC that is connected to the internet, Windows 7 can automatically locate and install suitable drivers via Windows Update.
Just connect the interface to a USB port on the computer - Windows will then show a notification that it is locating and installing device drivers...

...and then another message when the installation is complete...

If the PC you are installing on is not connected to the internet, you will need to download the drivers via another PC and install them before connecting the interface. Windows 7 compatible drivers are available here:
Stage 2: Verify the port settings
Once the drivers are installed, you need to determine which COM port has been assigned to the interface by Windows. To do this you need to go into the Windows Device Manager.
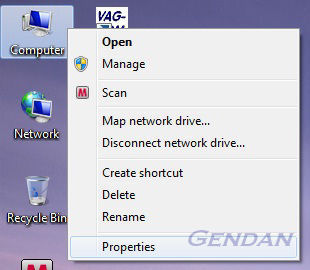
Find the 'Computer' link on the desktop or the Start Menu, click the Right Mouse Button on it and choose Properties:
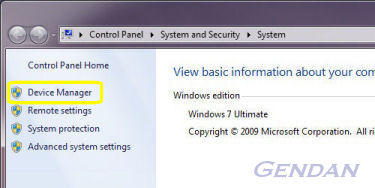
When the 'System' box appears, click on the Device Manager link on the left hand side:
Then when the Device Manager window appears, click on the arrow next to "Ports (COM & LPT)" to see which COM port has been assigned to your interface - it will show as a 'USB Serial Port':
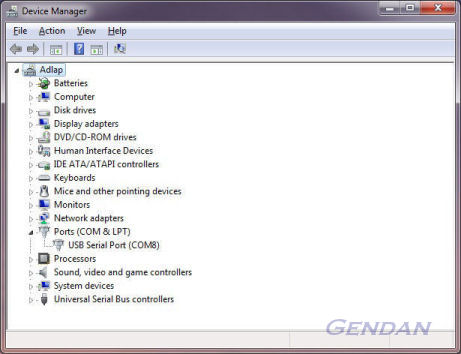
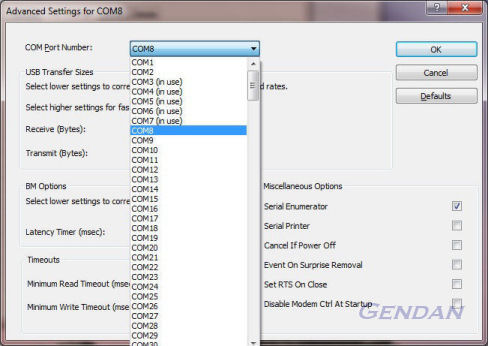
VAG-COM 409.1 can only connect to a COM port between COM1 and COM4.
-
If the port number assigned to your interface is between 1 and 4, remember which port it's on, then skip to stage 3 - installing VAG-COM.
- If the port number assigned to your interface is higher than 4 (in the example above it is COM8), then you will need to change the port number.
To do this, double-click on the USB Serial Port to go into its properties, then click on the Port Settings tab:
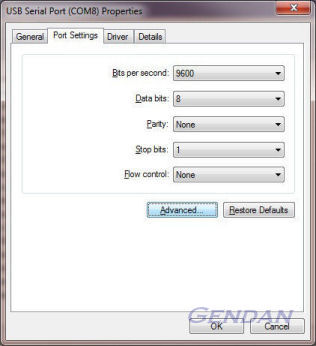
Then click on the 'Advanced' button - this will show you a list of all the COM port numbers you could assign to the interface. Select a port number between 1 and 4 then press ok (if possible choose one that is not shown as 'in use'):
Once that is done, click ok until you are back to the Windows desktop.
Stage 3: Download and install the VAG-COM Software
Next you need to download VAG-COM 409.1 from the Ross-Tech website:
www.ross-tech.com/vag-com/download/archives.html
(Use the link for version 409.1 - shown as 'For MODERN
SERIAL Interfaces')
Save the file to your computer, then run it.
When installing VAG-COM on Windows 7, it is important that you do NOT install it within the 'Program Files' folder. Windows 7 protects this folder and prevents programs from writing files into it, which would prevent VAG-COM from working.
So when you see the screen showing the location for installation, change it to another folder, e.g. C:\Ross-Tech\VAG-COM:

Once you have changed the installation location, click install, and wait for it to complete installation. The installer may not give a confirmation window - it may just disappear when it is finished.
Finally there are a few changes you need to make to get the software up and running.
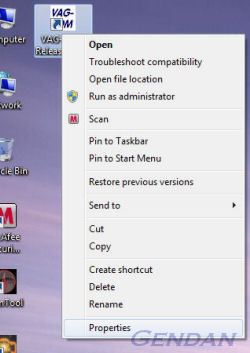
VAG-COM requires administrator access to function, so find the shortcut to 'VAG-COM Release 409-1', click the Right Mouse Button on it, and choose Properties.
Then on the Properties page, select the 'Compatibility' tab, and tick the option marked 'Run this program as an administrator':
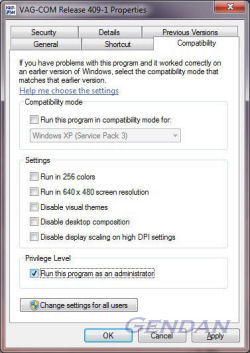
Click on 'Apply', then 'OK'.
You may need to repeat this for the shortcut on the Start Menu.
That should be all the preparation done. The final step is to open the VAG-COM software by that shortcut, go into the Options page, then select the COM port your interface is configured on:

Once you've selected the port, click Test, then OK. You should now be able to use the software.
