| Home | Product FAQs | ELM Chipset Interfaces: Windows Vista |
ELM Chipset Interfaces:
Windows Vista USB Driver Installation
Interface setup is very straightforward, and comprises 3 stages:
- Download and install the EngineCheck / VauxCheck diagnostics software or USB device drivers
- Setup the drivers
- Activate the EngineCheck software
Stage 1: Download and install EngineCheck / VauxCheck or USB drivers
-
If
you purchased your interface along with our EngineCheck
or VauxCheck software, follow the download instructions
emailed to you for the software
- If you have purchased a package from us but not received this email, please email us at support@enginecheck.co.uk
- If you purchased the EngineCheck Pro package, the software will have been supplied to you on CD.
- Once you have downloaded the EngineCheck setup file, double-click it to begin the setup.
- Follow the onscreen instructions to complete the setup.
- Once the setup has finished, please continue to Stage 2.
-
If
you purchased the ELM interface from us on its own
(i.e. without EngineCheck, EngineCheck Pro or VauxCheck),
then please download and run the driver installation
file from here
before continuing.
Stage
2: Setup the drivers
If so, installation is now complete, and you can jump
straight to activating the software.
Checking
the driver installation
To confirm that the drivers are correctly installed:
-
Open
the Device Manager.
- To do this, open the windows Control Panel and select "Classic View" in the top-left corner.
Then select the Device Manager option in Control Panel:

Depending on your windows settings, you may have to click OK to a "User Account Control" security warning
-
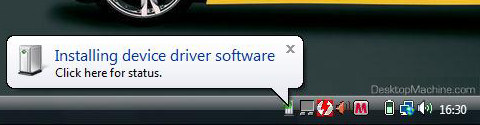
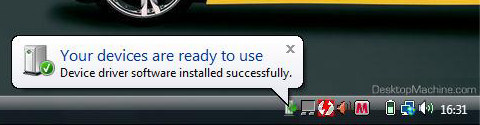
When Device Manager opens, click the + symbol next
to the heading
Ports (COM & LPT)
-
The device should appear with the label "USB
Serial Port (COMx)"
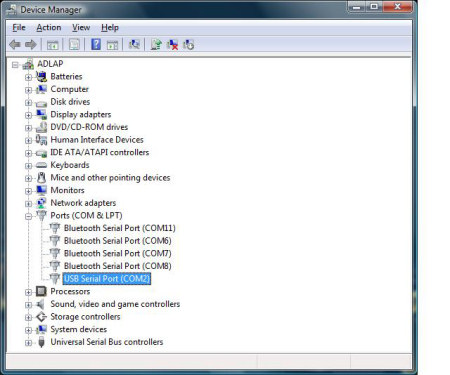
- Please make a note of the number shown after the
word COM - if EngineCheck is unable to locate your
inteface automatically, this will be the COM port
number you will need to use in the software.
- Should you need to reinstall the drivers, our software
also installs a copy of the driver setup file onto
your PC.
- If you purchased your interface from us along with
the EngineCheck or VauxCheck software, then look in
the folder in which you installed the software
(usually C:\Program Files\EngineCheck or C:\Program Files\VauxCheck)
- There should be file named "elminstall.exe"
- Run that file to reinstall the drivers
- If you cannot locate the file, you can download the same drivers from here.
- Please note, if you purchased your interface from another retailer, our USB drivers may not work for you, in which case you may need to contact the retailer or manufacturer to obtain updated drivers.
Stage 3: Activate the software
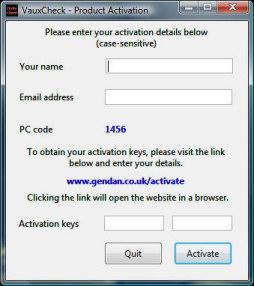
The first time you run the software, you will be required to enter your activation details - these details will be in your welcome email.
|
Double click the EngineCheck icon, or select: Start > All Programs > EngineCheck > EngineCheck ...from the Windows Start menu. |
|
|
- The activation window will appear, and will show
you a unique "PC code" number generated
by your PC (as illustrated) - Go to www.gendan.co.uk/activate and enter the details from the email, and your PC code. Your activation keys will then be emailed to you. (If you do not receive this email within a few hours, please contact us on 01792 588002) - Enter your details and click Activate PLEASE NOTE: the activation details are case-sensitive, so must be entered exactly as shown on the activation email. |
|
